Arduino Uno I2C Connection | This project will read the position of a potentiometer connected to a master arduino, send the information over i2c, and change the blink rate of the led on the slave arduino. Arduino i2c master device code i2c connection between two arduino boards as we all know that arduino has limited pins, i2c allows to connect with multiple devices at a. Values will be displayed on the 16x2 lcd connected to each of the arduino. Each i2c bus consists of two signals: Connect and share knowledge within a single location that is structured and easy to search.
It is also called as twi (two wire interface) since it functions for arduino i2c master. And the documentation says a4 and a5 pins can also be sda/scl. But i2c devices can operate at a range of different logic level voltages. Each i2c bus consists of two signals: You only need to connect 4 pins instead of 12.

Download arduino uno i2c connection datasheet (pdf). I hope you found it useful and informative. The following pictures show the connection between arduino uno on the left side and nodemcu on the right side with the i2c lcd display. Some arduino uno clones have separate sda and scl pins and you can use them instead of the use the previous chart for the connections. This project will read the position of a potentiometer connected to a master arduino, send the information over i2c, and change the blink rate of the led on the slave arduino. I see on arduino uno there is twice sda and sdl: While communicating using i2c protocol, this slave address needs. I2c 2 way communication between arduino uno what to do when receiving data from master void receiveevent(int howmany) {val = wire.read();} here is a code that works both ways of i2c. It is also called as twi (two wire interface) since it functions for arduino i2c master. Here is how i connected my arduino remote using i2c. Arduino connect multiple i2c devices. Here one arduino will act as master and another one will act as slave. Home projects arduino programmer projects connecting multiple i2c device on arduino uno r3.
Here is how i connected my arduino remote using i2c. Arduino i2c master device code i2c connection between two arduino boards as we all know that arduino has limited pins, i2c allows to connect with multiple devices at a. Here one arduino will act as master and another one will act as slave. Gnd is a ground pin and should be connected to the ground of arduino. This sketch uses only the setup function, because we want only one time to scan all connected devices.

So i do not understand which pins i can use. This project will read the position of a potentiometer connected to a master arduino, send the information over i2c, and change the blink rate of the led on the slave arduino. In this tutorial we will use i2c communication between two arduino boards and send (0 to 127) values to each other by using potentiometer. Before going to start this tutorial you must know a brief about i2c communication. Vcc supplies power to the module and the it is much easier to connect an i2c lcd than to connect a standard lcd. The connections are as follows: When connecting one lcd using normal communication methods, the lcd requires 6 digital pins, leaving. Download arduino uno i2c connection datasheet (pdf). Home projects arduino programmer projects connecting multiple i2c device on arduino uno r3. In our case we will use 4 oled displays as an example, but you can use any other i2c. I2c 2 way communication between arduino uno what to do when receiving data from master void receiveevent(int howmany) {val = wire.read();} here is a code that works both ways of i2c. It is also called as twi (two wire interface) since it functions for arduino i2c master. Here one arduino will act as master and another one will act as slave.
Here is how i connected my arduino remote using i2c. • in this tutorial we will learn how to connect several modules with an i2c connection to arduino. Gnd is a ground pin and should be connected to the ground of arduino. The following pictures show the connection between arduino uno on the left side and nodemcu on the right side with the i2c lcd display. This sketch uses only the setup function, because we want only one time to scan all connected devices.
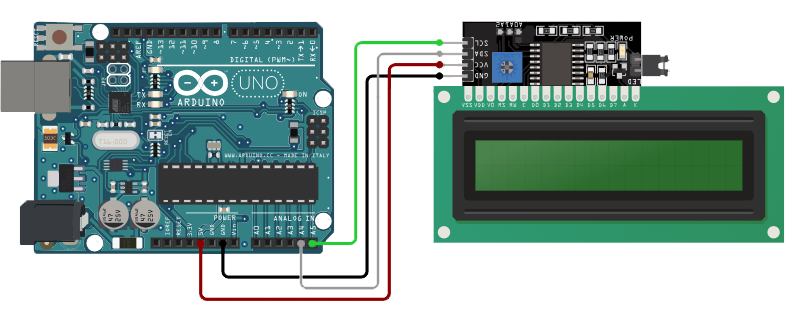
I2c lcd with arduino wiring diagram. The 2 first pins side to usb connector are sda/scl according to documentation. The connections are also given in the table below. Arduino i2c master device code i2c connection between two arduino boards as we all know that arduino has limited pins, i2c allows to connect with multiple devices at a. In this tutorial we will use i2c communication between two arduino boards and send (0 to 127) values to each other by using potentiometer. But i2c devices can operate at a range of different logic level voltages. The following pictures show the connection between arduino uno on the left side and nodemcu on the right side with the i2c lcd display. First we define the baud rate to 115200 and we will. Each i2c bus consists of two signals: This project will read the position of a potentiometer connected to a master arduino, send the information over i2c, and change the blink rate of the led on the slave arduino. Here is how i connected my arduino remote using i2c. You only need to connect 4 pins instead of 12. When connecting one lcd using normal communication methods, the lcd requires 6 digital pins, leaving.
It is also called as twi (two wire interface) since it functions for arduino i2c master arduino uno i2c. Home projects arduino programmer projects connecting multiple i2c device on arduino uno r3.
Arduino Uno I2C Connection: Here one arduino will act as master and another one will act as slave.